The first step in making Rosaries is, of course, the assembling of the necessary parts.
They are as follows:
59 Beads
3 Small Rings
1 Center Piece
59 “Eye” Pins
1 Crucifix (with ring)
8 Inches of Chain
The only tools needed are a Pair of Pliers - the Slim Round nose type - and a pair of sharp scissors.
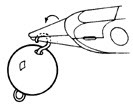
Step 1 Pick up one of the eye pins and insert it as far as it will go through one of the beads. Then with your fingers or pliers
![]() bend the straight portion of the wire over at right angles as shown in the sketch. Note that the bend must be as close to the bead as you can make it and it is made at right angles to the eye on the opposite end of the pin. This bend you have just made is the beginning of the new eye. The two eyes should be at right angles to each other to avoid “kinking” of the finished chain of beads.
bend the straight portion of the wire over at right angles as shown in the sketch. Note that the bend must be as close to the bead as you can make it and it is made at right angles to the eye on the opposite end of the pin. This bend you have just made is the beginning of the new eye. The two eyes should be at right angles to each other to avoid “kinking” of the finished chain of beads.
Step 2 With the pliers in the right hand, grip the bent over section of the pin (now pointing to your right), near the nose of the pliers and near the end of the pin. Circle your thumb toward you and put a little bend in the end of the pin. Since the human wrist is not constructed so that it will make a complete circular turn, it is now necessary that you take two grips or “bites” of the work. The little bend mentioned above is the beginning of the “Eye” you are making. To complete the “Eye” and make it into a perfect circle, you now grasp the jaws of the pliers with your LEFT HAND. This will keep them tight on the Eye Pin. Then circle your RIGHT HAND to the right as far as it will goand take a fresh grip of the pliers. Now when you turn the pliers toward yourself, you will form an almost complete circle in the wire like the one already formed on the other end. This eye should not be quite closed. Leave it open a little so that you can later on close it around the next pin in the chain. This is the basic process in making a Rosary. It should be practiced until you can form an eye on one end of the pin almost identical in size and roundness with the original one. Now, put the pins through all 59 of the beads and form eyes on each one as above, leaving the new eyes not quite closed.
Step 3 Pick up two of the beads and hook the new eye of the one through the original eye of the other. This is the first step in assembling the Rosary. Grasping the pin with your pliers in the manner shown by the sketch, close the eye. DO NOT squeeze the eye closed by pressing on the sides - doing this is sure to spoil the roundness of the eye. Also do not press on your pliers any tighter than necessary. It is very easy to mar the pins. Using the method described above, assemble the five groups of ten and the group of three which you need.
Step 4 Cutting the chain is next. Fourteen pieces are required, each four or five links long as you prefer. These are easily snipped off with a pair of scissors, but in cutting the chain be careful to have exactly the same number of links in each of your fourteen pieces.
Step 5 Open one of the small “jump” rings by bending the prongs sideways. Opening the ring in this manner makes it easy to close without losing its shape. Slip the ring through one of the upper openings in the centerpiece and a piece of the chain and close it.
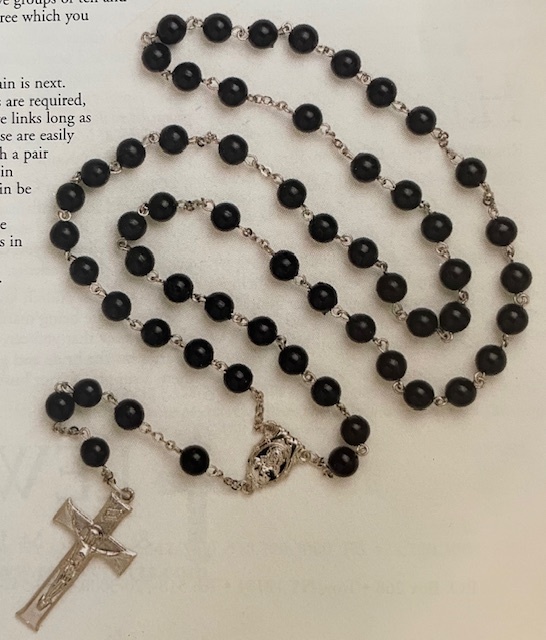
Step 6 The final assembly consists of joining together the various parts in the approved manner as shown in the picture. In connecting, it is necessary to slightly open the closed end of the last eye pin of each decade, in order to attach the chain. Before making the final assembly of the long string of beads and the centerpiece, hold the string up by one end and let it dangle freely. Then when you attach the free end of the centerpiece, see that there is no “twist” in the string. Even a slight twist will cause the Rosary to kink - something easily avoided with a little care. CAUTION: Use as little pressure on the pliers as you can when forming and closing the eyes. The wire is delicate and too much pressure will make marks which cannot be removed. Be sure when you are assembling that EVERY eye is completely closed. No one wants a Rosary which comes apart. NOTE: In each Kit, you will find an extra bead and an extra Eye Pin. Should you lose or break more than this, let us know and we will send you enough parts to complete your Rosary.
Directions for the double strand rosary
Lay one of the long pieces of chain on a sheet of heavy cardboard and fasten one end of it to the board with scotch tape. Stretch the chain out straight and tight and tape it down again about seven inches from the end. Be absolutely sure that the links all lie the same way-not twisted.
Open the Eye of one of the eye pins slightly and slip it through a link of the chain one and one-quarter inches from the end. To make later operations easy, slip it through the link so that the opening is at the top. Now close the eye.
Skip three links and attach a second eye pin through the fourth link. Continue with an eye pin through every fourth link of the chain until you have attached ten pins. This is your first decade.
Now skip nine links and attach a longer eye pin. You will find six of these longer eye pins in the kit and they are necessary because the “Our Father” beads have filigree caps on each end. Skip nine more links and start the second decade. After attaching a few more eye pins you will come to the point where you have taped down the chain.
Remove both tapes and re-tape the chain with one tape near where you have added the eye pins and the other about seven inches farther along. Again be very sure that the chain is not twisted in the slightest and that the links all are perfectly flat.
Continue with the second decade until you have attached ten eye pins. Then skip nine links, use a longer eye pin, skip nine links, and start the third decade. Continue in the same manner for the five decades.
Next place a bead on each eye pin and form the new Eye (not quite closed). The Eyes are to be made so that the openings are on top rather than on the under side. This makes it easier to fit them into the second chain. Do not forget to add the filigree caps to the “Our Father” beads.
Lay the chain with eye pins and beads attached on the cardboard. Place the second chain beside it about one half-inch away, running parallel. Tape both chains down near the ends and about seven inches along. Be sure that the second chain is straight and flat without twist.
Bring the first eye pin up through a link one and one-quarter inches from the end of the second chain and close it. Skip three links and proceed, re-taping when necessary. When you have finished you should have a one and one quarter inch length remaining on each chain. If there is a slight variation, clip off any excess links so that both ends of both chains are uniform.
Bring one pair of ends together and fasten to the centerpiece with a jump ring. Do the same with the other pair of ends.
Use the same method in assembling the short chain which goes between the centerpiece and the crucifix with two "Our Fathers" and three “Hail Mary’s”.
We cannot be too emphatic in cautioning you to keep all the chains perfectly flat without twist. The slightest twist will ruin the appearance of the finished Rosary.
WARNING: Certain products can expose you to chemicals such as phthalate or nickel, which are known to the State of California to cause cancer, birth defects or other reproductive harm. Do not put in your mouth. Do not swallow. For more information, go to www.P65Warnings.ca.gov.

